
Investigating cisco routers
This blog post is aimed at incident response teams who need to investigate and gather evidence from a cisco router in a forensically sound manner. This may be where an internet facing router has been identified and is using default logon creds, perhaps Cisco Smart install was left enabled or you may just want to take a look at who has been poking around on the box. This post outlines how to gather simple things such as logs from the device and also check to see if the IOS has been tampered with and potentially implanted with something malicious.
When triaging or investigating any network device never perform a reboot, this will lose all volatile data within the device and compromise the investigation.
1. Disclaimer
I accept no responsibility for any unexpected behaviour or sudden reboots of any Cisco router where this process has been implemented. Ensure that work is undertaken alongside the network team/admins and appropriate controls are in place.
This post does not cover routers which are running IOS-XR.
2. Basic Log Collection
The initial stage of evidence gathering can be completed by issuing a number of ‘show’ commands and recording the output. You will need to configure your PuTTy client to write a log file of your session.
• First open PuTTy and click ‘Logging’
• Select ‘All session output’
• Click ‘Browse’ and select the location you would like to save the log file
• Save the filename as something unique such as the routers hostname and save it as a .txt file
• Click ‘Session’ and enter the IP address of the router in the ‘Host Name’ field
• Ensure your port number is 22 and click ‘Open’ - Port 21 if your using telnet :-|
• You will now be connected to the router and presented with the command line prompt
The following commands must be run in ‘enable’ mode, some commands may not work depending on the IOS version or certain features may not be in use. ‘Enable’ mode allows the user to run a higher level and wider range of ‘show’ commands such as ‘show running-config’.
To enter enable mode simply type ‘enable’ and then press enter.
Run the following commands to gather as much evidence as possible, feel free to amend and remove commands as required.
Note some may be required by Cisco if the incident is escalated to them i.e. ‘show tech-support’:
Note: If the router is a C3900e, don’t run the verify /md5 system:memory/text command as it will crash the router
terminal length 0
show history all
show logging
show clock detail
show version
show rom-monitor
show running-config
show startup-config
show vstack
show reload
show users
show ip route
show ip eigrp nei
show ip ospf nei
show ip bgp summary
show cdp nei detail
show ip arp
show ip interface
show ip interface brief
show tcp brief all
show ip sockets
show ip nat translations verbose
show ip cache flow
show ip cef
show snmp user
show snmp group
show snmp community
show access-lists
show ipv6 interface brief
show ipv6 route
show stack
show processes
show tech-support
show platform tlb
show license udi
verify /md5 system:memory/text
From the above commands “show history all” will provide you with any commands that have run on that device.
3. IOS File Verification On Flash
This section describes how to verify the integrity of the device firmware stored in flash. However this may not guarantee that the Cisco IOS device is free from compromise and further analysis described in this post will be required.
From the Cisco command line of the router you wish to perform the integrity checks, issue the following command (This should have been recorded in the previous section):
show version
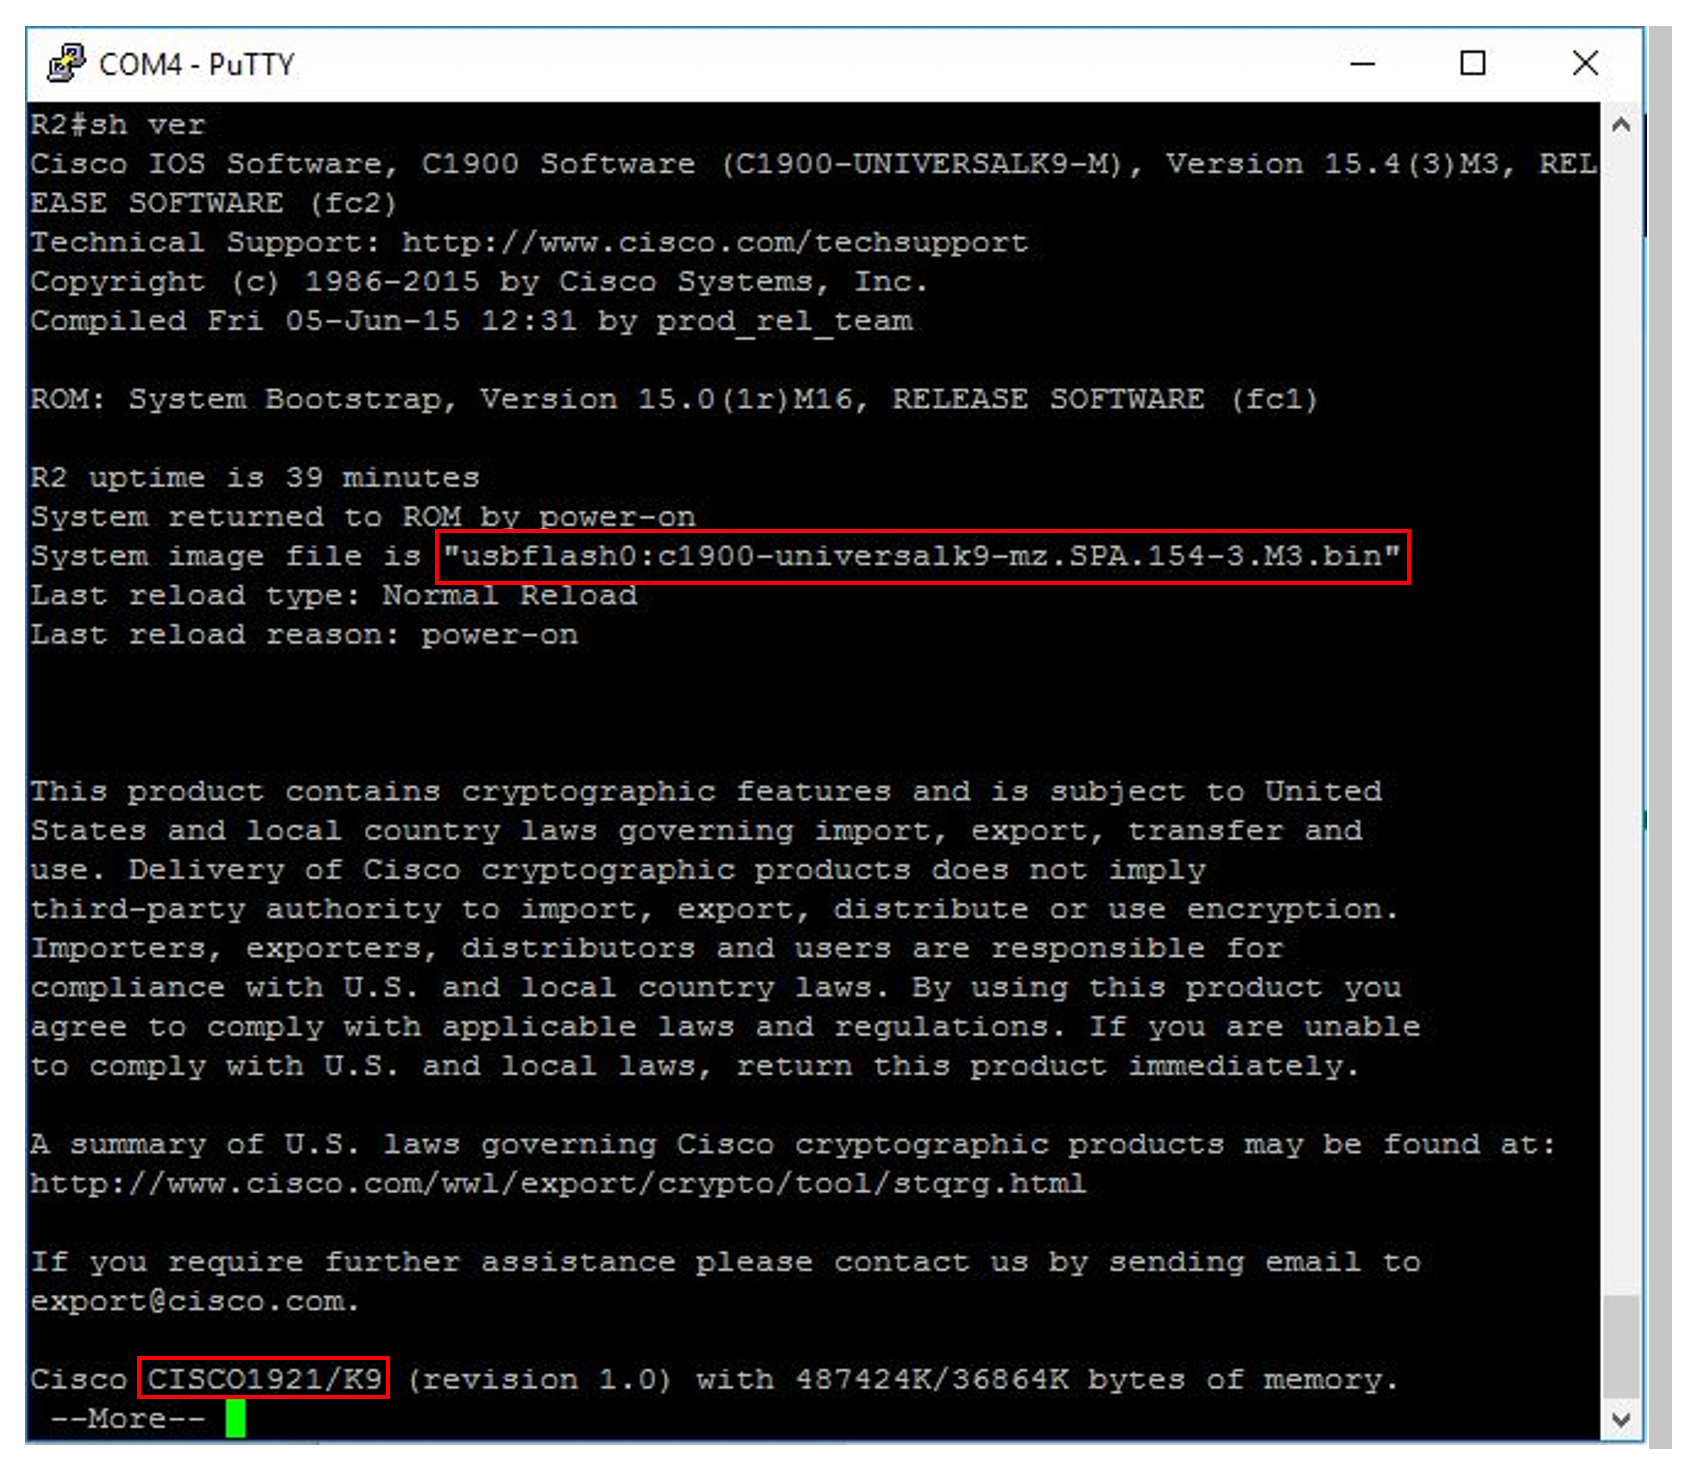
The above output tells us the router model is a Cisco 1921 and also contains the running IOS image, in this case it is ‘C1900-universalk9.mz.SPA.154-3.M3.bin’. ‘154-3.M3’ is the version number of the IOS, this represents version 15.4.3M3. ‘usbflash0’ indicates where the IOS is located, this may vary so double check the location listed. The image may be stored under ‘flash:’.
To generate an MD5 hash of the IOS enter the following command:
verify /md5 location:filename

The router will now start to calculate an MD5 hash of the IOS file you have selected. Once this has been completed the following output will be displayed:
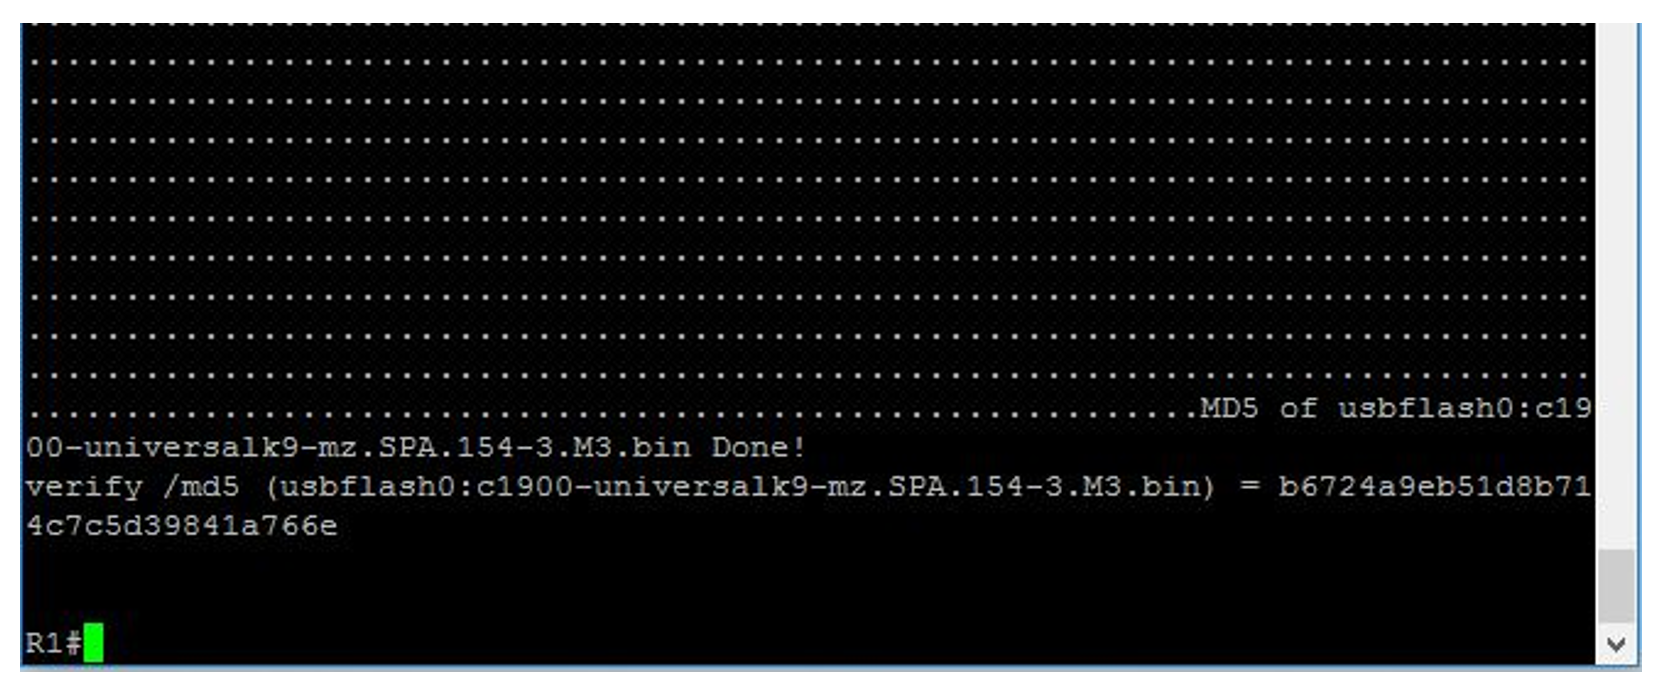
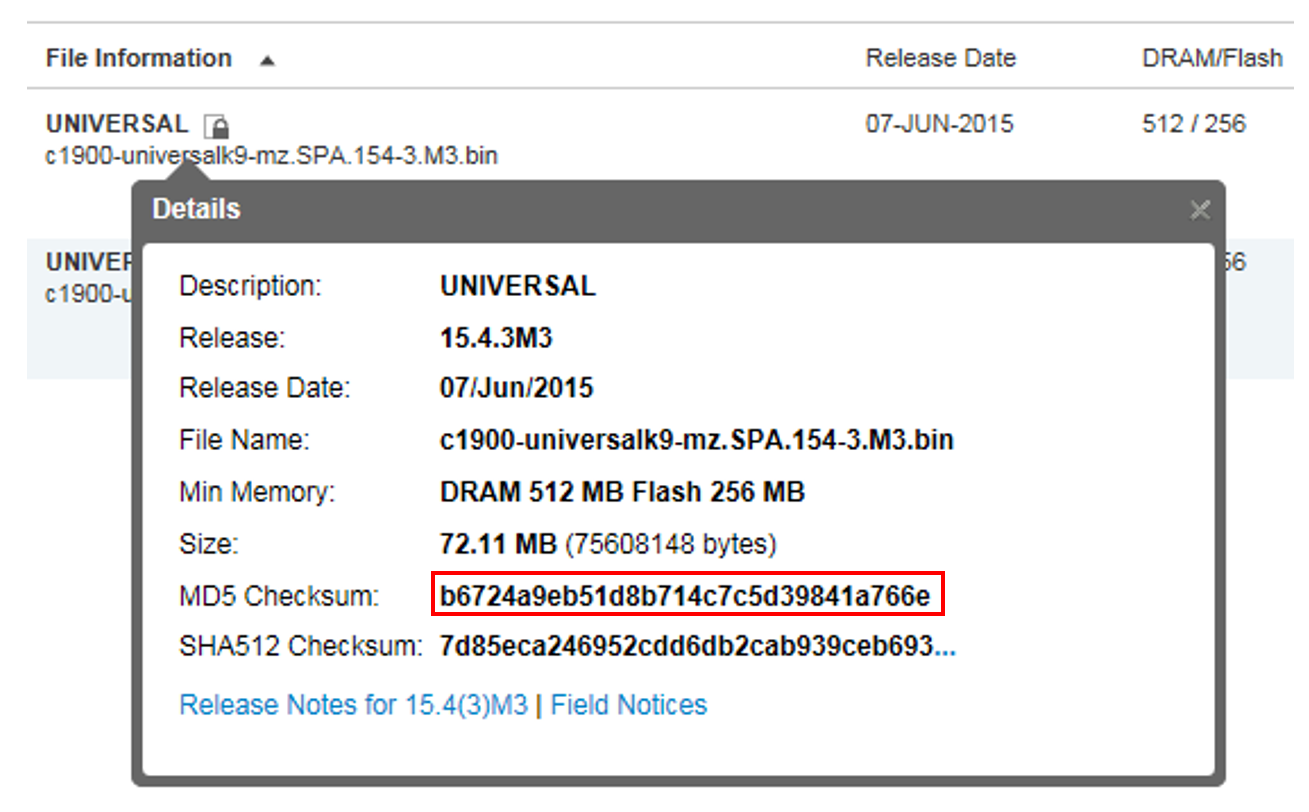
The MD5 hash generated for this file is b6724a9eb518b714c7c5d39841a766e.
4. Diagnostic Data Capture, Preliminary Work
The following information outlines how to configure a Cisco device for the transfer of data via FTP. The data transfered from the cisco device will be a memory dump and an image of the device. The captured image is the running IOS of the device.
Note: It is advisable for the investigator to create a directory in their home folder on the FTP server which they data is being transferred to. If there is more than one device being investigated ensure that files are written to per device/per dump directories.
Where a dump is being repeated for any reason, I have found it best practice to write the files to a new directory for that device rather than overwrite any existing dumps, even if they contain errors.
The resulting directory structure should look something like this:
~/
~/network/
~/network/hostname/
~/network/hostname/core
~/network/hostname/coreiomem
~/network/hostname/coreMain_Memory
~/network/hostname/config.txt
~/network/hostname/Transcript.txt
~/network/hostname/c2900-universalk9-mz.SPA.152-4.M5.bin
If a second dump of the device is made, put the new files in a separate directory:
~/network/hostname-YYMMDD/
~/network/hostname-YYMMDD/core
~/network/hostname-YYMMDD/coreiomem
~/network/hostname-YYMMDD/coreMain_Memory
~/network/hostname-YYMMDD/config.txt
~/network/hostname-YYMMDD/Transcript.txt
~/network/hostname-YYMMDD/c2900-universalk9-mz.SPA.152-4.M5.bin
To configure the dump parameters, enter config mode by entering the following command:
conf t
Press enter, this will put the router in configuration mode so you can make changes to the running config. Note username and password does not need to be configured if using anonymous FTP upload.
service timestamps debug datetime msec localtime
service timestamps log datetime msec localtime
service internal
ip ftp username <username>
ip ftp password <password>
exception core-file /home/<network>/<upload_directory>/<filename>
exception dump <ip address of ftp server>
exception protocol ftp
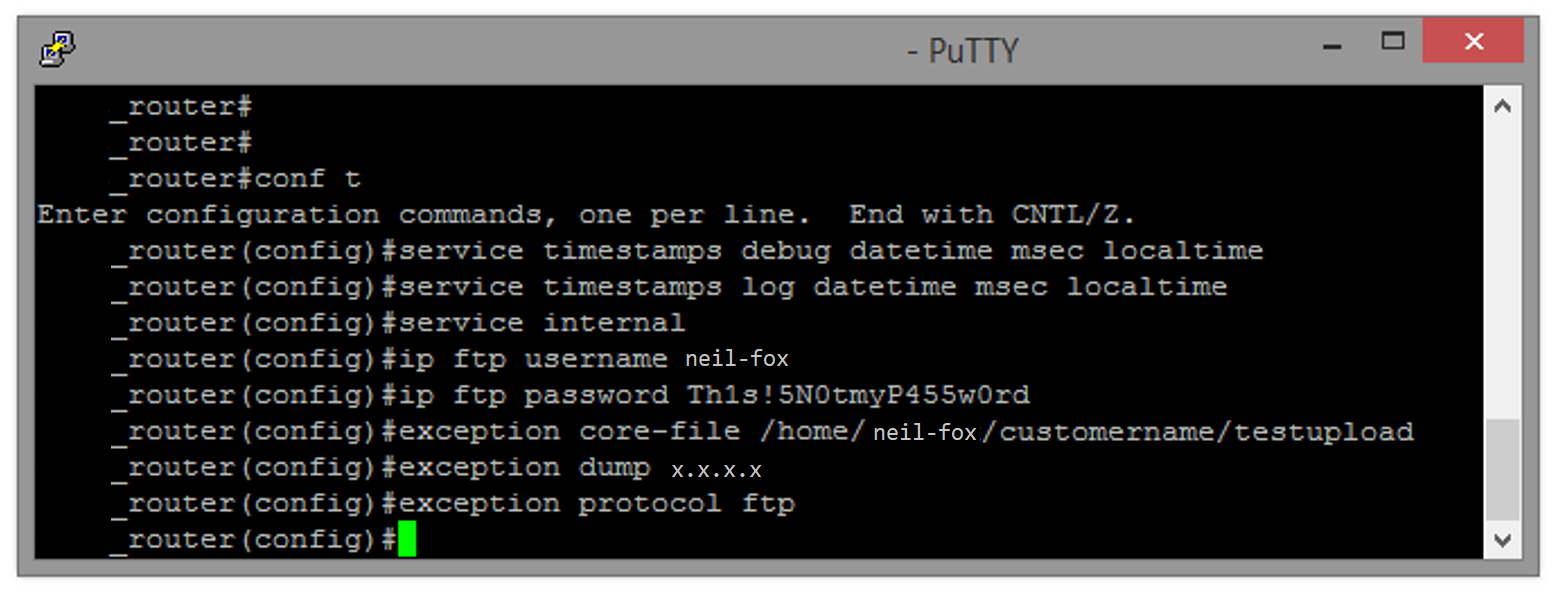
You will now need to come out of config mode by typing the following command:
exit
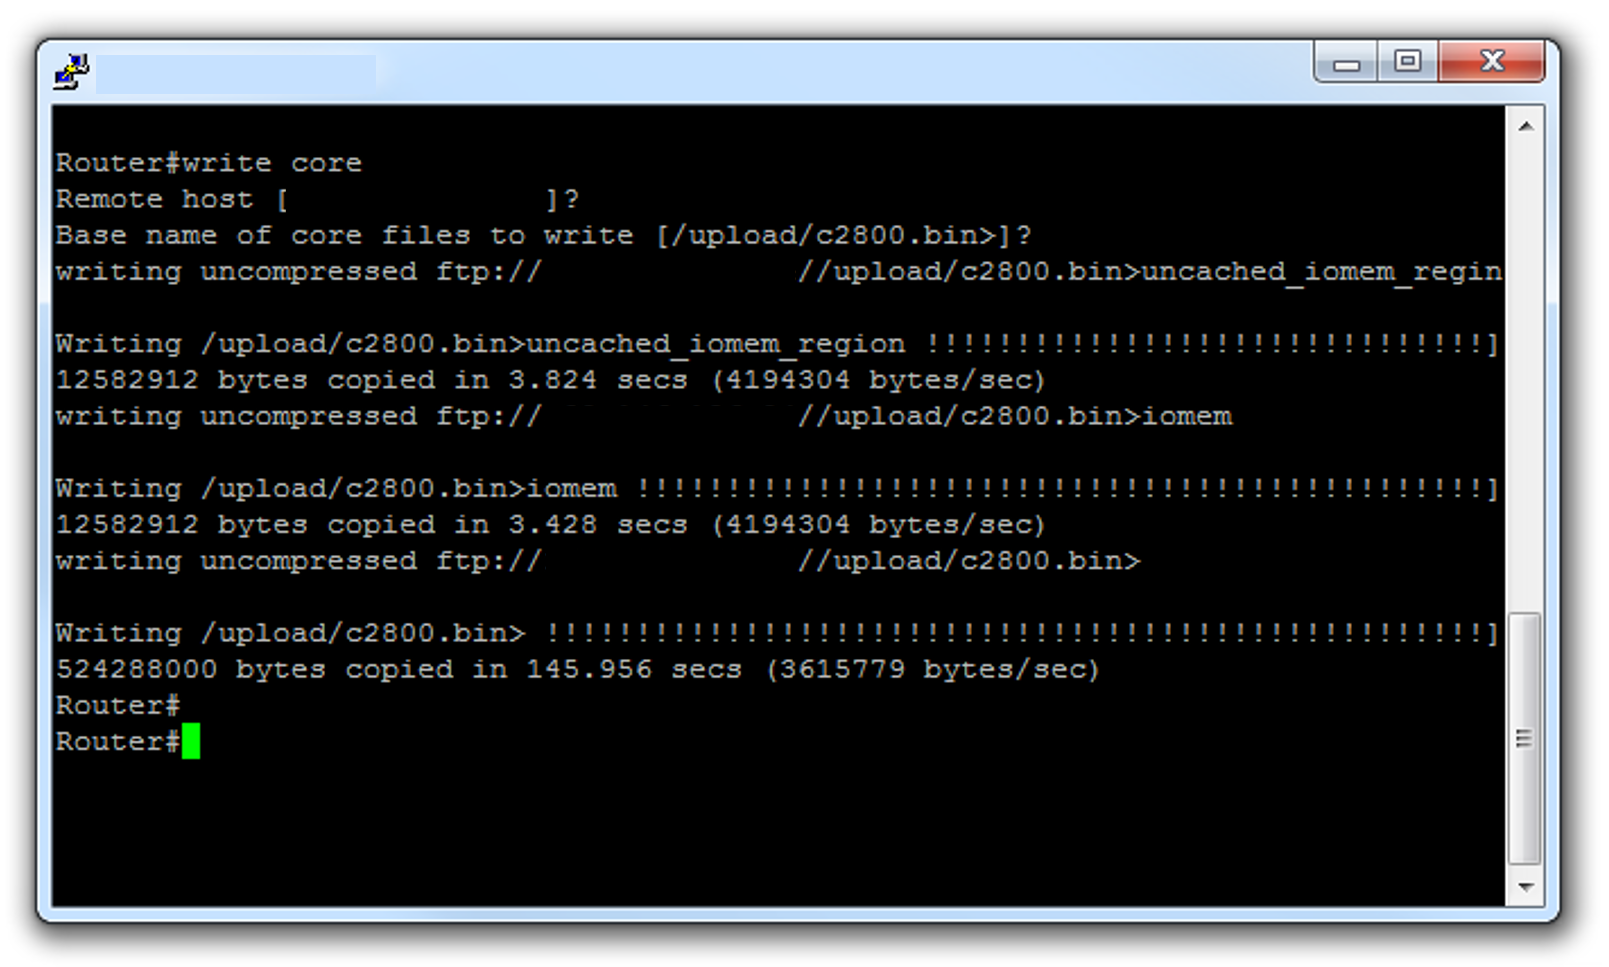
5. Memory Dump & Image Capture
The memory dump requires that you have followed the instructions in the previous section.
In ‘enable’ mode execute the following command:
write core
Note the IP addresses in the image below have been redacted.
6. Comparing IOS hash values
On the FTP server where the image has been transferred to use the following command to generate an MD5 Hash of the image:
md5sum <filename>
The hash generated should match the one identified on cisco.com.
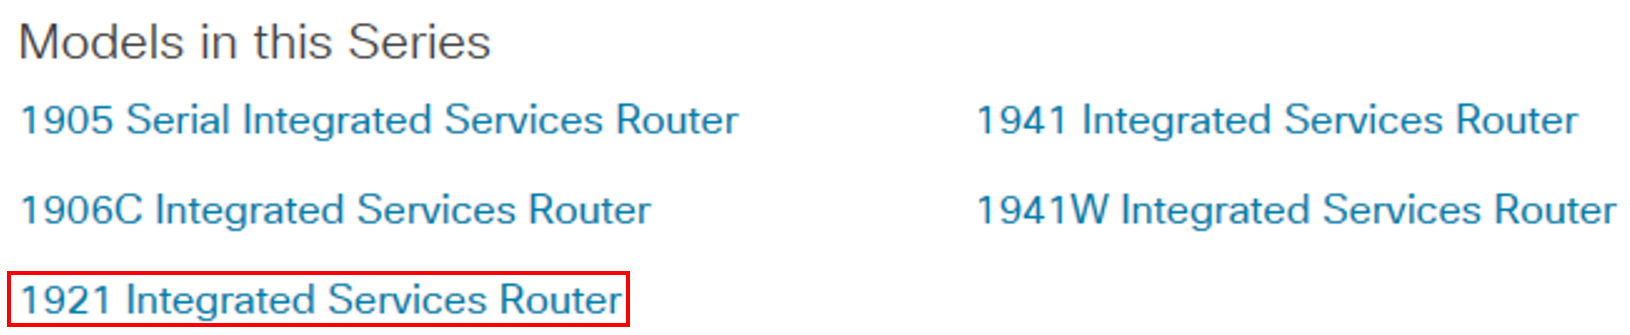
To identify the correct hash on cisco.com, click ‘Support’ then ‘Routers’. You should then be able to find the model range for the router you are investigating, in this example the router is part of the 1900 range.

Click the model of the router from the list, from running the ‘sh version’ command we know this example is a Cisco 1921.
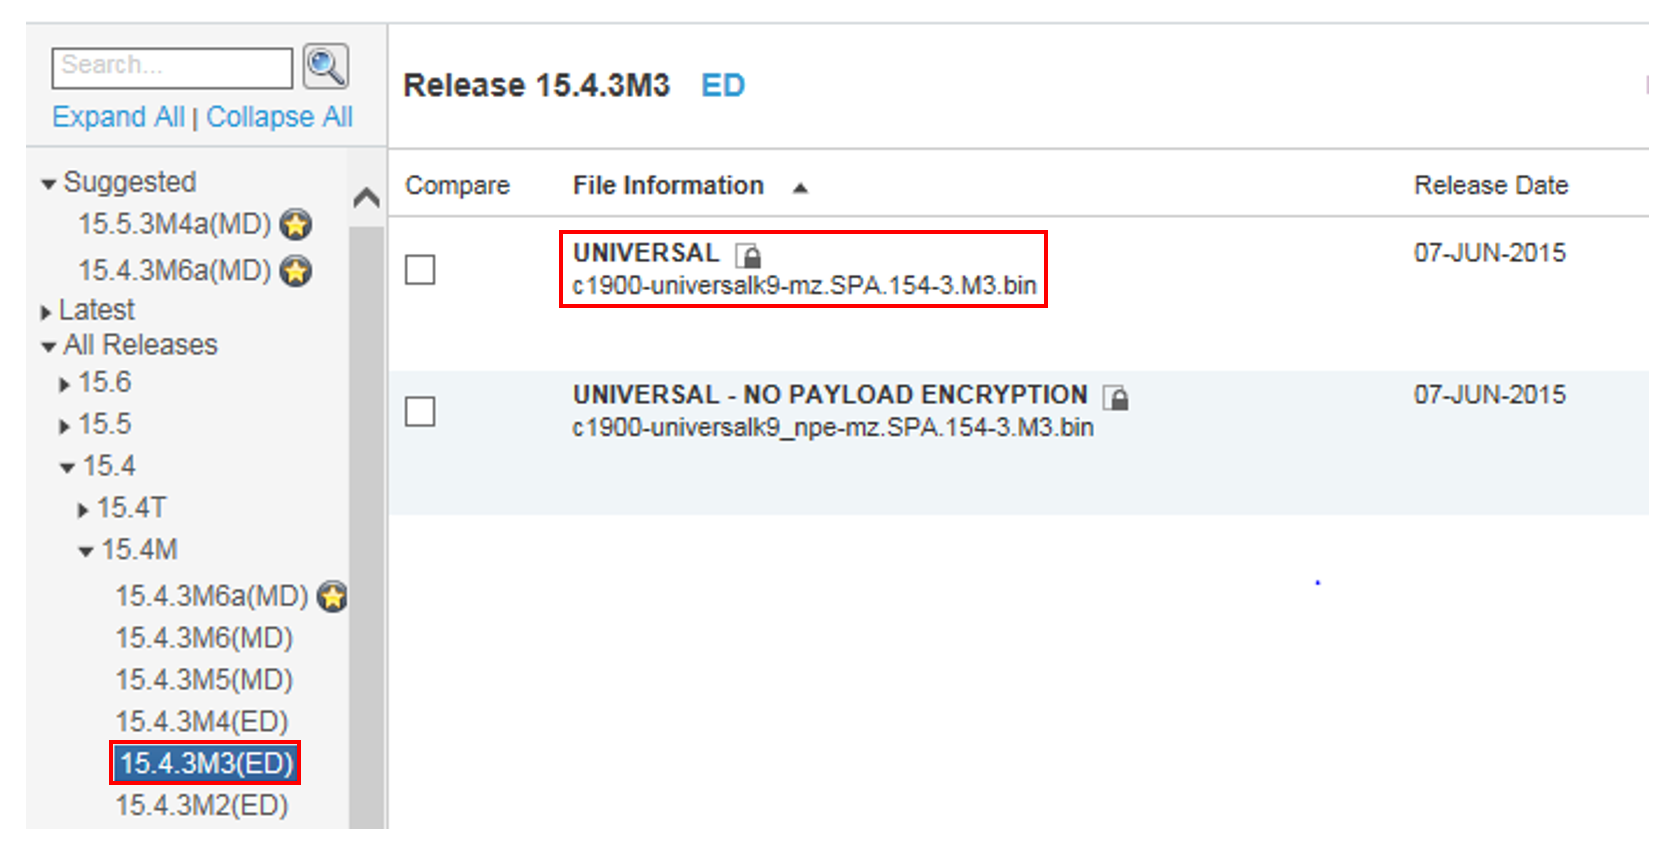
Click on the correct router model, then click on the ‘Downloads’ tab. You will now need to find the same IOS version, in this case its ‘C1900-universalk9.mz.SPA.154-3.M3.bin’ which is version 15.4.3M3. Click on any IOS link beginning with ‘15’ (This number will be different if your IOS starts with a different number) then select ‘All Releases’ from the left hand pane. From the drop down select the options until you get to the correct version you are looking for.
Hover your mouse over the correct version of the IOS and you will get a pop-up that contains the MD5 hash.
Once the correct IOS and hash has been identified this should be compared to the 2 hashes that were created earlier in this post for the IOS file stored in flash and for the image capture that was uploaded to the ftp server.
To analyse the memory dumps I recommend Didier Stevens Network Appliance Forensic Toolkit. This is an awesome tool that can pull pcap data and other useful artifacts from the memory dumps of a cisco router.